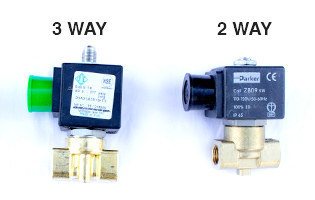
2 WAY VS 3 WAY
Solenoids come in two basic forms, 2 way and 3 way.

2 way valves function in just two ways- inlet and outlet. Water is supplied under pressure to the inlet side of the valve. When the coil is activated, the pressurized water or steam is allowed to pass, and exits the outlet side of the valve.
3 way valves function nearly the same way, they also include a discharge to relieve any pressure in the system when the valve is deactivated. These are most commonly used in group heads, and this discharge is where the backflush soap exits.
The easy way to tell the difference is looking at the top of the valve guide. A two way valve will be solid at the top of the guide, while the three way valve will have an outlet that extends out of the top of the coil and is normally hooked up to a drain.
FLANGE VS THREADED
DO YOU HAVE A FLANGE OR A THREADED STYLE VALVE?

The flange style have a flat base that will attach onto another flat surface with up to four screws.
Threaded will have tubes attached to either end of the valve. The difficulty with threaded valves is the base comes in a number of different sizes. Most common are ⅛” and ¼” The best way for you to tell the difference is to measure. The ⅛” valve is about 8.5mm across the opening for the fitting, the ¼” is about 11.5mm across. Always measure before you order. Someone before you may have installed a different size valve than what comes with the machine.
SOLENOID COMPONENTS
COILS
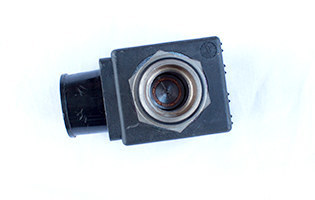
The coil of a solenoid is actually an electromagnetic coil. When switched on and supplied power, the coil becomes a magnet and pulls the nucleus up, allowing your material to pass from inlet to outlet. The voltage rating on your coil is critical. You can not put a 110v coil on a 220v machine.
NUCLEUS
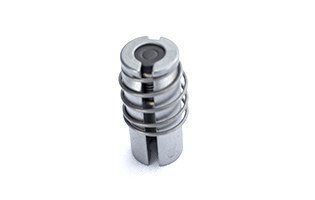
The nucleus, also called a piston, plunger or rocket, is the device inside the guide that makes the seal. They’re found most often with either a green or red seal. A three way nucleus can be used in a two way valve.
VALVE GUIDE
The valve guide is the part of the valve the nucleus travels inside of and the coil fits over.
BASES
Bases come in two styles- threaded and flange. When removing a flange style from it’s mounting surface, the two o-rings should always be replaced. When reinstalling, be sure you line those holes on the base up with the holes on the flange! The base will mount up, but the valve will not function correctly.
Pro Tip: It is always suggested to replace the complete solenoid valve with the coil. If the valve parts are worn out, it is likely that the coil is also. This will also ensure that you have parts that fit the first time, as the coil and valve guide must be from the same manufacturer to work together.
They are different sizes based on the manufacturer of the valve, so it’s best to stick with the same manufacturer when it comes time to replace parts
DO YOU HAVE A PROBLEM WITH YOUR SOLENOID?
- Some common problems with solenoids are:
- Noise - Buzzing or Chattering
- Leaks - An overfilled boiler, dripping water or steam escaping
- Not Opening - If your valve does not click, it is not opening
TROUBLESHOOTING
There are a few quick tests you can do to troubleshoot your solenoid to determine if it is the source of your headache.
FLOW
The most basic test is to ensure you have supply to the valve, and output from the valve. First thing you’ll need to do is determine in which direction the system flows. Don’t be fooled by markings on the valve body! La Marzocco installs their boiler fill valves backwards. Go through the hydraulic circuit and determine the direction of flow. Carefully crack the supply if you’re able to ensure the valve has good supply.
After you’ve confirmed supply, you’ll need to confirm there is output from the valve. It’s a little more tricky, but you’ll need to crack the output and then activate the valve to be sure there is output. If so, the solenoid is not your problem. If not, you’ve got a little more work to do.
COIL
To check the coil first visually examine for any defects. Is the coil swollen? Does it have any burn marks? Is the plastic casing compromised at all? If so, stop and replace the coil.

Next use your multimeter to confirm you have power being supplied to the coil when it’s been activated. You should have basically the same power at the coil as is being supplied from the wall, except in cases where the power is stepped down- such as some Rancilio models that use 24v coils on a 220v machine. If you do have power, on to the next test!
Now, to check if your coil is becoming magnetized. You can test to see if your coil is working by placing a tool on the top of the valve guide. You should feel a slight bit of magnetism between the tip of the tool and the valve guide when the coil has been activated. It’s pretty faint, so if in doubt, you can try the other way. Some folks will unplug the machine, remove the coil, plug the machine back in, put a screwdriver where the guide should be passing through the coil, and then activate the coil. The coil should stick to the screwdriver, and give a faint vibration through the tool. If so, your coil is working fine! If not, get yourself and replacement!
NUCLEUS
If you’ve got good supply to the valve, and your coil is working, it may be the nucleus causing the issues.

Remove the coil from the valve guide. Carefully remove the valve guide from the base. As you lift that guide away, the nucleus should half pop out, half fall out. If it’s stuck in there? Replace that solenoid!
Should your nucleus fall free from the valve guide, inspect it. There should be very little wear on the sealing surfaces at the top and bottom of the nucleus. You might see a slight indentation, but if it’s much more than that, consider replacing the nucleus. See how small the sealing surface is? See how shallow the seat is? It doesn’t take much to cause the solenoid to malfunction if the nucleus has worn.
Finally, if everything else looks okay, check to make sure the nucleus moves free in the valve guide. You should be able to depress the nucleus all the way into the valve guide. It should travel smoothly and without obstruction. It should also spring back firmly. If not, inspect the valve guide. Again, it should be clean and clear. If not, you can try and clean it in a solution of Espresso Parts Espresso Machine Cleaner or Dezcal to clear up whatever buildup you may have inside.
Pro Tip: Repairing an espresso machine is dangerous. There are many hazardous factors at play- power, steam, scalding temps- if ever in doubt STOP and call a service professional in your area.


